Generating Dynamic OpenGraph Images with next/og

- •Prerequisites
- •The Problem
- •Solution Overview
- •Implementation Details
- •File-Based Metadata Convention
- •Basic ImageResponse Usage
- •Loading Custom Fonts
- •Styling Approaches
- •Dynamic Content Rendering
- •Static Generation
- •Exporting Metadata
- •Key Takeaways
- •Best Practices
- •Common Pitfalls
- •Performance Considerations
- •What I Learned
- •Next Steps
- •Code
When sharing links on social media platforms like Twitter, LinkedIn, or Facebook, you've probably noticed that some links show beautiful preview images while others show generic placeholders. These preview images are OpenGraph images, and they can significantly impact click-through rates and engagement.
Instead of manually creating static images for every blog post, page, or category, Next.js provides a powerful solution: the next/og package. With it, you can generate dynamic OpenGraph images programmatically using React components and TypeScript.
Prerequisites
Before diving in, you should be familiar with:
- Next.js - Understanding of the App Router and file-based routing
- React - Basic component composition and JSX
- TypeScript - Type definitions and interfaces
- CSS - Basic styling concepts (flexbox, gradients)
The Problem
Static images don't scale well. If you have a blog with hundreds of posts, creating individual OpenGraph images becomes tedious and time-consuming. Each time you update a post's title or metadata, you'd need to regenerate the image manually. This approach also makes it difficult to maintain consistency across your site's visual branding.
Dynamic image generation solves these problems by letting you define templates that automatically generate images based on your content. When a social media crawler requests an OpenGraph image, your Next.js app generates it on-the-fly or pre-generates it at build time.
Solution Overview
Next.js provides a file-based metadata convention that makes generating OpenGraph images straightforward. By creating an opengraph-image.tsx file in any route segment, Next.js automatically uses it to generate the OpenGraph image for that route.
The next/og package provides the ImageResponse API, which converts React components into images using the same rendering engine that powers Vercel's OG Image Generation service. You write JSX, and it gets rendered as a PNG image.
Implementation Details
File-Based Metadata Convention
Next.js uses a special file naming convention for metadata. To generate an OpenGraph image for a route, simply create an opengraph-image.tsx file in that route's directory. For example:
The opengraph-image.tsx file must export a default async function called Image that returns an ImageResponse. You can also export alt, size, and contentType constants to configure the image metadata.
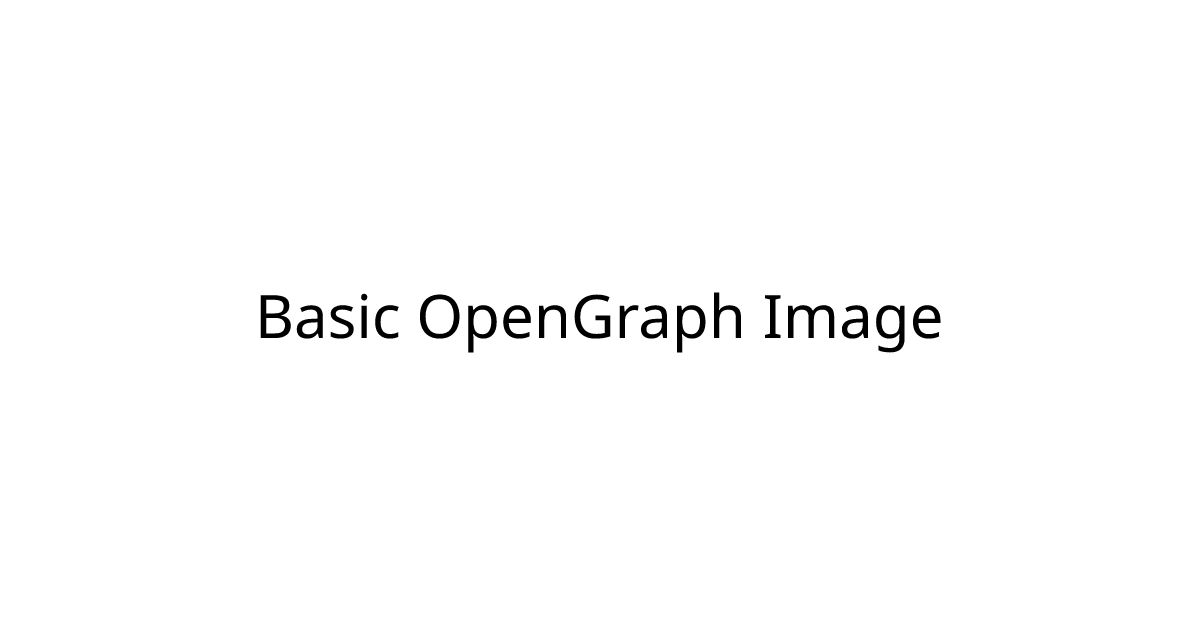
Basic ImageResponse Usage
Here's a minimal example of an OpenGraph image generator:
app/blog/[slug]/opengraph-image.tsx
import { ImageResponse } from "next/og";

export const alt = "Blog Post";
export const size = {
  width: 1200,
  height: 630,
};
export const contentType = "image/png";

export default async function Image() {
  return new ImageResponse(
    <div
      style={{
        fontSize: 60,
        background: "white",
        width: "100%",
        height: "100%",
        display: "flex",
        alignItems: "center",
        justifyContent: "center",
      }}
    >
      Hello World
    </div>,
    {
      ...size,
    },
  );
}
The ImageResponse constructor takes two arguments:
- A JSX element (the visual design of your image)
- Configuration options (width, height, fonts, etc.)
The standard OpenGraph image size is 1200x630 pixels. This aspect ratio (1.91:1) works well across most social media platforms. While you can use different dimensions, sticking to this standard ensures your images display correctly everywhere.
Loading Custom Fonts
One of the most powerful features of next/og is the ability to use custom fonts. This lets you maintain brand consistency across your OpenGraph images. Here's how to load and use a custom font:
app/blog/[slug]/opengraph-image.tsx
import { readFile } from "node:fs/promises";
import { join } from "node:path";
import { ImageResponse } from "next/og";

export default async function Image() {
  // Load the font file
  const typewriter = await readFile(
    join(process.cwd(), "assets/fonts/Typewriter-Serial-Regular.ttf"),
  );

  return new ImageResponse(
    <div
      style={{
        fontFamily: "Typewriter Serial",
        fontSize: 60,
        // ... other styles
      }}
    >
      Custom Font Text
    </div>,
    {
      width: 1200,
      height: 630,
      fonts: [
        {
          name: "Typewriter Serial",
          data: typewriter,
          style: "normal",
          weight: 400,
        },
      ],
    },
  );
}
The font file is loaded using Node.js's readFile API, then passed to ImageResponse in the fonts array. Make sure the name property matches the fontFamily you use in your styles.
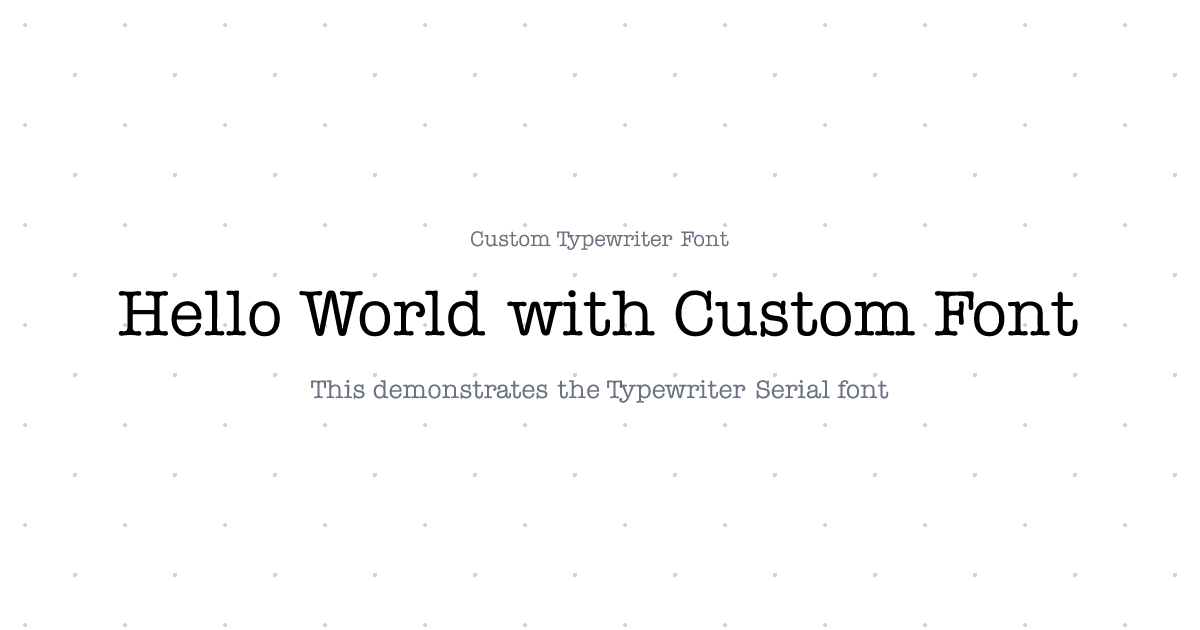
next/og supports TrueType Font (TTF) and OpenType Font (OTF) formats. Make sure your font files are in one of these formats. You can find free fonts on Google Fonts or other font repositories.
Styling Approaches
ImageResponse supports two styling approaches:
- Inline styles - Standard React inline style objects
- Tailwind-like classes - Using the
twprop (which is actually powered by Tailwind CSS)
You can mix both approaches. Here's an example that uses both:
app/blog/[slug]/opengraph-image.tsx
<div
  style={{
    height: "100%",
    width: "100%",
    display: "flex",
    flexDirection: "column",
    backgroundColor: "white",
    backgroundImage:
      "radial-gradient(circle at 25px 25px, lightgray 2%, transparent 0%)",
    backgroundSize: "100px 100px",
    padding: "40px",
  }}
>
  <div tw="text-xl text-gray-500">Metadata</div>
  <div tw="flex flex-col items-start">
    <div tw="text-[#aa6f1a] mb-6">Label:</div>
    <div tw="font-bold mb-6">Title</div>
  </div>
</div>
The tw prop accepts Tailwind CSS classes, which can be more concise for common styling patterns. However, complex CSS features like gradients still need to be done with inline styles.
Dynamic Content Rendering
The real power of dynamic OpenGraph images comes from rendering content based on your data. Here's how you can access route parameters and render dynamic content:
app/blog/[slug]/opengraph-image.tsx
import { formatDate } from "date-fns";
import { ImageResponse } from "next/og";
import { allPublishedBlogsByDate } from "@/lib/content";

export default async function Image({ params }: PageProps<"/blog/[slug]">) {
  const { slug } = await params;

  // Fetch your content
  const blog = allPublishedBlogsByDate.find((blog) => blog.slug === slug);

  if (!blog) {
    notFound();
  }

  return new ImageResponse(
    <div
      style={{
        // ... styles
      }}
    >
      <div tw="text-xl text-gray-500">
        {`${formatDate(blog.date, "MMM d, yyyy")} • ${blog.readingTime}`}
      </div>
      <div tw="font-bold mb-6">{blog.title}</div>
      <div tw="text-2xl text-gray-500">{blog.excerpt}</div>
    </div>,
    {
      width: 1200,
      height: 630,
    },
  );
}
You can access route parameters, fetch data from your CMS or database, and render any dynamic content you need. The image will be generated with the actual content at request time or build time.
Static Generation
For better performance, you can pre-generate OpenGraph images at build time using generateStaticParams. This ensures all images are ready immediately and reduces runtime overhead:
app/blog/[slug]/opengraph-image.tsx
export function generateStaticParams() {
  return allPublishedBlogsByDate.map((blog) => ({
    slug: blog.slug,
  }));
}
When you export generateStaticParams, Next.js will generate static images for all the returned params at build time. This is especially useful for blog posts, product pages, or any content that doesn't change frequently.
Static generation is recommended for most use cases. It reduces server load and ensures fast image delivery. Only use dynamic generation if your content changes frequently or you have too many pages to pre-generate.
Exporting Metadata
The exported constants (alt, size, contentType) help Next.js understand your image configuration:
alt- The alt text for accessibilitysize- The dimensions of the imagecontentType- The MIME type (usually"image/png")
These are optional but recommended for better metadata handling:
app/blog/[slug]/opengraph-image.tsx
export const alt = "Bismit Panda's Blog";
export const size = {
  width: 1200,
  height: 630,
};
export const contentType = "image/png";
Key Takeaways
Here are some important things I learned while implementing OpenGraph images:
Best Practices
-
Use static generation when possible - Pre-generating images at build time improves performance and reduces server costs.
-
Keep designs simple - Complex layouts can be slow to render. Stick to flexbox layouts and avoid nested structures when possible.
-
Test your images - Use tools like opengraph.xyz or social media preview tools to verify your images display correctly.
-
Maintain consistency - Use the same fonts, colors, and layout patterns across all your OpenGraph images to build brand recognition.
-
Handle edge cases - Long titles or descriptions can break layouts. Consider truncating text or using responsive font sizes.
Common Pitfalls
- Font loading errors - Make sure font file paths are correct and fonts are loaded before use.
- Missing exports - Don't forget to export
alt,size, andcontentTypefor proper metadata. - Text overflow - Long text can overflow containers. Use text truncation or responsive sizing.
- Color contrast - Ensure sufficient contrast between text and background for accessibility.
Performance Considerations
- Static generation is faster than dynamic generation
- Font loading adds overhead - only load fonts you actually use
- Complex gradients and backgrounds can slow rendering
- Consider caching strategies for frequently accessed images
By default, opengraph-image.tsx files run on the Node.js runtime. For better performance, especially with dynamic generation, consider using the Edge runtime by adding export const runtime = 'edge' at the top of your file. However, note that Edge runtime has limitations (no file system access, so custom fonts won't work).
What I Learned
Implementing dynamic OpenGraph images taught me several valuable lessons:
Design matters - A well-designed OpenGraph image can significantly increase click-through rates. Spending time on the visual design pays off.
Consistency is key - Using the same design patterns across all images creates a cohesive brand experience. I created a shared background pattern and color scheme that I reuse everywhere.
TypeScript helps - Strong typing caught several bugs early, especially around route parameters and content data structures.
Static generation is powerful - Pre-generating images at build time means instant delivery and no runtime costs. This is especially important for sites with many pages.

Next Steps
Now that you understand how to generate dynamic OpenGraph images, here are some ideas to take it further:
- Add images to your images - You can include actual images in your OpenGraph images by fetching and embedding them
- Create templates - Build reusable components for common OpenGraph image patterns
- Add animations - While static images are standard, you could experiment with animated formats (though social platforms may not support them)
- A/B test designs - Try different layouts and measure which ones get better engagement
- Generate for all routes - Add OpenGraph images to all your important pages, not just blog posts
The foundation is solid. With next/og, you can create beautiful, dynamic OpenGraph images that scale with your content and maintain brand consistency across all your social media shares.
Code
View the complete implementations on GitHub:
Or browse the entire repository: bismitpanda/portfolio-next
On this page
- •Prerequisites
- •The Problem
- •Solution Overview
- •Implementation Details
- •File-Based Metadata Convention
- •Basic ImageResponse Usage
- •Loading Custom Fonts
- •Styling Approaches
- •Dynamic Content Rendering
- •Static Generation
- •Exporting Metadata
- •Key Takeaways
- •Best Practices
- •Common Pitfalls
- •Performance Considerations
- •What I Learned
- •Next Steps
- •Code
About the author
Bismit Panda
Full Stack Developer with a passion for typography and user experience. Writing about web development, design, and the intersection of technology and creativity.
View ProfileRelated Blogs

Generate Beautiful Resumes with React PDF and Next.js
A dynamic, code-based resume generator that lets you version control your resume and export professional PDFs on demand.